
Bear mug: How I made article 20

 This article is brought to you by Lizzsews.


In today's article, I will guide you through how I made a 'watercolour' purple bear mug with infusible ink without a mug press. Follow along with this project and share your result in Lizzsews Facebook group.


What I used:

- Mug with sublimation coating

- Infusible ink purple transfer sheets

- Cricut

- Standardgrip mat

- EasyPress 2, mini + mat

- Lint-free cloth

How I made it:

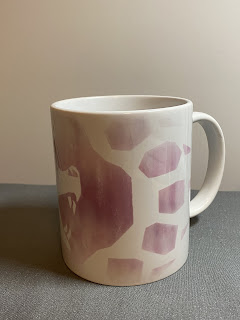
I started off by looking for a design that I wanted to go on the mug. I ended up finding a really cool bear paw mug design in cricut design space. Image ID: #M2636F1F9.

I kept the design as is but sized it down a very small amount. I mirrored the design and placed my purple infusible ink onto the mat and cut. I weeded the design by peeling up the not needed pieces and wiped the mug with a lint-free cloth.

I wrapped the design around the mug, liner side up. Now was the trickiest and most difficult part as I don't have a mug press yet. I heated my easy press all the way and preheated my easypress 2 to 400°. I slowly went around the mug and pressed with my mini, once I was done I tried to peel of the transfer sheet and barely any of the ink was on the mug! It looked like a mess. I didn't peel much and I put it right back down onto the mug.

I went even slower and pressed all around the mug, I even used my easypress 2 for some more pressure and heat. After what felt like ages, I peeled the lining up and the mug looked great! The majority of the ink had gone onto the mug and I was left with a super cool water colour effect.

What other designs do you think would look awesome on a mug with the water colour effect?


Recommended read: How I made: Valentine's Day Card With Cricut


Leave a comment below and let me know if you made this mug, and share your no mug press tips! Don't forget to subscribe to get notified for my next blog post :)

Comments

Popular posts from this blog

10 Things You Need To Start Machine Embroidery Today

This article is brought to you by Lizzsews Thinking about diving into machine embroidery but not sure where to start? Here’s everything you need to know to get started—without spending a fortune. Interested in sewing?  Recommended read: 10 Things You’ll Need to Start Sewing! 1. Get Yourself an Embroidery Machine You can start with any embroidery machine, but here are a few great beginner-friendly options: Brother SE600 – A combo machine that sews and embroiders. It’s affordable, versatile, and my top pick for beginners. Brother PE550D – Embroidery-only and comes with built-in Disney designs. Super cute! Brother SE1900 – A step up, with more advanced features and a larger embroidery area. 💡 Tip: Set a clear budget before buying, b uy the largest hoop your budget allows . While the SE600’s 4x4 hoop is great for starters, you may outgrow it quickly—and the next hoop size up is a big price jump. Recommended read: How to Choose the Right Embroidery Machine   ...

8 Reasons Why Your Upper Thread Is Shredding On Your Embroidery Machine

 This article is brought to you by  Lizzsews . Here are some reasons why your top thread might be shredding while you’re embroidering! Starting machine embroidery is definitely a challenge, and troubleshooting is hard.  Recommended read: 10 Things you need to start machine embroidery today Often when your top thread is shredding, it’s caused by when the thread goes through the eye of the needle or while it’s going through the thread guides.  1. A dull or bent needle How long has it been since you’ve changed that needle? It might be time to swap it out! A needle only lasts about 8-10 hours of stitching, this amount of time may vary depending on what you are making. It’s good to have lots of needles on hand. Recommended read: When should I change the needle for machine embroidery 2. Are you using the right needle for the project? Are you embroidering heavier fabrics? Like denim or leather? If so, you’ll want to use a heavier needle size like 90/14. If you’re just...

Guide To The Three Main Machine Embroidery Stabilizers

This article is brought to you by  Lizzsews . Here's everything you need to know about the three main types of machine embroidery stabilizers, what they're used for and how to pick the right one. 💡 Why Stabilizers Matter Stabilizers are essential in machine embroidery. They help support your fabric, prevent puckering , and ensure your design comes out clean and crisp. A stabilizer is placed underneath your fabric. Some special ones, called toppers , go on top, but these are only used for certain materials, like towels or blankets. 👉 You always need a bottom stabilizer. Toppers are optional and only used for specific projects. 🏷️ The 3 Main Types of Stabilizers 1. ✂️ Cutaway Stabilizer Cutaway stabilizer is non-woven , permanent, and ideal for stretchy or knit fabrics like t-shirts, baby onesies, and fleece. Why it's great: Provides strong support Prevents pulled or sagging stitches Stays put even after washing and wearing Comes pre-cut or in ro...