
How I made article 6

This article is brought to you by Lizzsews.


Today I was scavenging around my house... looking for the right object to strike at... something that I could customize for my next make…

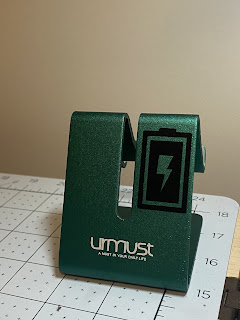
In today's article, I will guide you through how I spiced up a Phone stand/holder. Follow along with this project and share your result in Lizzsews Facebook group.


Recommended read: How I made article series


What I used:


  - Standardgrip mat

  - Removable vinyl

  - Transfer tape

  - Phone stand/holder

  - Lysol wipe

  - Cricut


The steps I took:


I wiped the phone stand with a Lysol wipe to create a clean and clear surface for my design. 


I decided on a charging design to use, and you can find it here on cricut design space with this image ID: #M26F6CBEC


I cut it out at 0.9” wide and kept it on uniform sizing. I cut my vinyl to the size of the design I was going to cut, but just a little bigger and placed the liner side down on the mat.


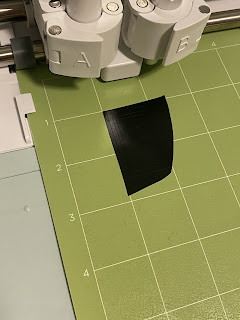
After it was cut, I weeded the design. I cut a piece of transfer tape a little bit larger than the vinyl and burnished the vinyl onto the transfer tape. 


Burnish: polish by rubbing. Smooth/scrape. 

To weed: weeding is when you remove negative pieces around a cut image.


I slowly peeled up the transfer tape, ensuring that each piece of vinyl was attached to it. 


Next was placing the transfer tape with the vinyl design onto my phone stand. I placed the design in the spot that I wanted it, using the grid lines on the transfer tape to help, and I burnished the design onto the phone stand. 


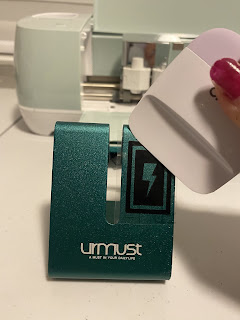
I found that this particular phone stand material was difficult to get the design to adhere to. It took quite a bit of scraping and slow peeling checks. But it turned out great in the end 😃


Recommended read: How I made article 5, TBA
Recommended read: Volleyball blanket: How I made article 7


Leave a comment below and let me know if you made this phone stand! Don't forget to subscribe to get notified for my next blog post :)

Comments

Popular posts from this blog

10 Things You Need To Start Machine Embroidery Today

This article is brought to you by Lizzsews Thinking about diving into machine embroidery but not sure where to start? Here’s everything you need to know to get started—without spending a fortune. Interested in sewing?  Recommended read: 10 Things You’ll Need to Start Sewing! 1. Get Yourself an Embroidery Machine You can start with any embroidery machine, but here are a few great beginner-friendly options: Brother SE600 – A combo machine that sews and embroiders. It’s affordable, versatile, and my top pick for beginners. Brother PE550D – Embroidery-only and comes with built-in Disney designs. Super cute! Brother SE1900 – A step up, with more advanced features and a larger embroidery area. 💡 Tip: Set a clear budget before buying, b uy the largest hoop your budget allows . While the SE600’s 4x4 hoop is great for starters, you may outgrow it quickly—and the next hoop size up is a big price jump. Recommended read: How to Choose the Right Embroidery Machine   ...

8 Reasons Why Your Upper Thread Is Shredding On Your Embroidery Machine

 This article is brought to you by  Lizzsews . Here are some reasons why your top thread might be shredding while you’re embroidering! Starting machine embroidery is definitely a challenge, and troubleshooting is hard.  Recommended read: 10 Things you need to start machine embroidery today Often when your top thread is shredding, it’s caused by when the thread goes through the eye of the needle or while it’s going through the thread guides.  1. A dull or bent needle How long has it been since you’ve changed that needle? It might be time to swap it out! A needle only lasts about 8-10 hours of stitching, this amount of time may vary depending on what you are making. It’s good to have lots of needles on hand. Recommended read: When should I change the needle for machine embroidery 2. Are you using the right needle for the project? Are you embroidering heavier fabrics? Like denim or leather? If so, you’ll want to use a heavier needle size like 90/14. If you’re just...

Guide To The Three Main Machine Embroidery Stabilizers

This article is brought to you by  Lizzsews . Here's everything you need to know about the three main types of machine embroidery stabilizers, what they're used for and how to pick the right one. 💡 Why Stabilizers Matter Stabilizers are essential in machine embroidery. They help support your fabric, prevent puckering , and ensure your design comes out clean and crisp. A stabilizer is placed underneath your fabric. Some special ones, called toppers , go on top, but these are only used for certain materials, like towels or blankets. 👉 You always need a bottom stabilizer. Toppers are optional and only used for specific projects. 🏷️ The 3 Main Types of Stabilizers 1. ✂️ Cutaway Stabilizer Cutaway stabilizer is non-woven , permanent, and ideal for stretchy or knit fabrics like t-shirts, baby onesies, and fleece. Why it's great: Provides strong support Prevents pulled or sagging stitches Stays put even after washing and wearing Comes pre-cut or in ro...