
How I created BC SVG

This article is brought to you by Lizzsews


I was asked by a friend to create a shirt with this design that she had seen online. And of course, I said yes! So, here’s how I made this BC SVG. 


Recommended read: What is an SVG


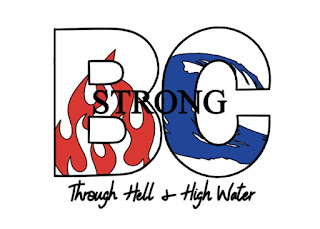
I created this design:


Using this reference picture:


I wanted the design to be Cricut iron-on compatible and Iactually really like the simpler design! But making it was trickier than it looks. 


I started out by placing the reference picture into procreate and drawing the words and the BC letters outline. I exported my drawing as a transparent png image and converted it to an svg image in convertio. I took this svg and imported it to cricut design space. 


Recommended read: What is procreate


After I found two images that I liked to match the fires for the B and the floods for the C, I had to figure how to do something called overlay or knockout to place the design only inside the letter. 


Cricut image ID’s:

Fire: #M2733F722

Wave: #MAA29B53


To do this step, I used Cricut design space on my laptop. I selected both the flame and the B and clicked slice. I selected contour and clicked to remove the un-needed objects. I selected the pieces of the B outline and welded them together. I repeated the same steps for the flame and the C (as well as the inside B pieces)


Recommended read: What is Cricut smart vinyl

Recommended read: What is the Cricut brayer


Leave a comment below and let me know if you try the knockout/overlay strategy and how it goes! And don't forget to subscribe to stay up to date with all of Lizzsews new articles. See you next time!

Comments

Popular posts from this blog

10 Things You Need To Start Machine Embroidery Today

This article is brought to you by Lizzsews Thinking about diving into machine embroidery but not sure where to start? Here’s everything you need to know to get started—without spending a fortune. Interested in sewing?  Recommended read: 10 Things You’ll Need to Start Sewing! 1. Get Yourself an Embroidery Machine You can start with any embroidery machine, but here are a few great beginner-friendly options: Brother SE600 – A combo machine that sews and embroiders. It’s affordable, versatile, and my top pick for beginners. Brother PE550D – Embroidery-only and comes with built-in Disney designs. Super cute! Brother SE1900 – A step up, with more advanced features and a larger embroidery area. 💡 Tip: Set a clear budget before buying, b uy the largest hoop your budget allows . While the SE600’s 4x4 hoop is great for starters, you may outgrow it quickly—and the next hoop size up is a big price jump. Recommended read: How to Choose the Right Embroidery Machine   ...

8 Reasons Why Your Upper Thread Is Shredding On Your Embroidery Machine

 This article is brought to you by  Lizzsews . Here are some reasons why your top thread might be shredding while you’re embroidering! Starting machine embroidery is definitely a challenge, and troubleshooting is hard.  Recommended read: 10 Things you need to start machine embroidery today Often when your top thread is shredding, it’s caused by when the thread goes through the eye of the needle or while it’s going through the thread guides.  1. A dull or bent needle How long has it been since you’ve changed that needle? It might be time to swap it out! A needle only lasts about 8-10 hours of stitching, this amount of time may vary depending on what you are making. It’s good to have lots of needles on hand. Recommended read: When should I change the needle for machine embroidery 2. Are you using the right needle for the project? Are you embroidering heavier fabrics? Like denim or leather? If so, you’ll want to use a heavier needle size like 90/14. If you’re just...

Guide To The Three Main Machine Embroidery Stabilizers

This article is brought to you by  Lizzsews . Here's everything you need to know about the three main types of machine embroidery stabilizers, what they're used for and how to pick the right one. 💡 Why Stabilizers Matter Stabilizers are essential in machine embroidery. They help support your fabric, prevent puckering , and ensure your design comes out clean and crisp. A stabilizer is placed underneath your fabric. Some special ones, called toppers , go on top, but these are only used for certain materials, like towels or blankets. 👉 You always need a bottom stabilizer. Toppers are optional and only used for specific projects. 🏷️ The 3 Main Types of Stabilizers 1. ✂️ Cutaway Stabilizer Cutaway stabilizer is non-woven , permanent, and ideal for stretchy or knit fabrics like t-shirts, baby onesies, and fleece. Why it's great: Provides strong support Prevents pulled or sagging stitches Stays put even after washing and wearing Comes pre-cut or in ro...