
How to sew a fabric tray; the quicker way

 This article is brought to you by Lizzsews.

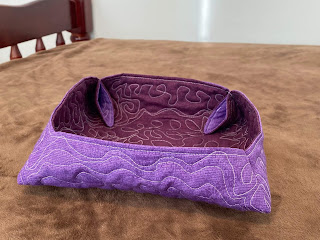
In one of my previous articles, I shared how to make a fabric tray. These are one of my favourite projects,

Recommended read: How to sew a fabric tray

The only thing that wasn’t as fun with making the trays was the bindings. So, I created this pattern. This new fabric tray is just as beautiful, but can be made quicker!

This leaves more time for free motion quilting and makes the perfect last-minute gift. But the one receiving the gift would never be able to tell that it was made last-minute!


What you will need:

  • Cotton fabric
  • Iron and ironing board
  • Batting
  • Rotary cutter and cutting mat (or scissors)
  • Seam gauge or measuring tape
  • Sewing machine
  • Sewing machine thread and needle
  • Free motion quilting foot
  • Optional: pins and safety pins


The steps:


  • Cut two pieces of fabric and a piece of batting to 13” x 13”


Optional: you could embroider one of the pieces. 


  • ‘Sandwich’ the pieces together. Place the two pieces of fabric right sides together and place the batting on top. 

  • Sew around the perimeter of the square. Leave a gap open so that you can flip it all right side out afterwards. 
  • Topstitch around the perimeter of the square and make sure to close the gap while topstitching. 
  • Free motion quilt create a fun design using your free motion quilting foot, don’t forget to lower the feed dogs.
Recommended read: What are feed dogs

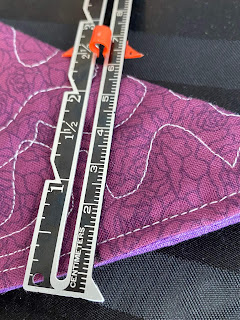
  • Fold the ‘quilt’ in half diagonally and mark 2 1/2” in on each side and create a line from the mark straight to the mark across from it 2 1/2” in. Fold the other way and repeat. 

  • Sew down each of these lines. 

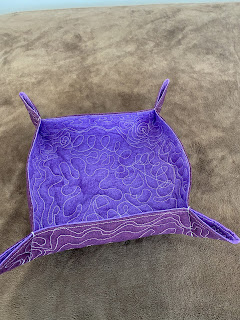
  • Flip the tray so that the excess corner pieces are on the inside holding the tray sturdy and upright. 

Recommended read: How to sew tea towels
Recommended read: How to sew a bowl cozy

Leave a comment below and let me know if you made this tray! And don't forget to subscribe to stay up to date with all of Lizzsews new articles. See you next time!

Comments

Popular posts from this blog

10 Things You Need To Start Machine Embroidery Today

This article is brought to you by Lizzsews Thinking about diving into machine embroidery but not sure where to start? Here’s everything you need to know to get started—without spending a fortune. Interested in sewing?  Recommended read: 10 Things You’ll Need to Start Sewing! 1. Get Yourself an Embroidery Machine You can start with any embroidery machine, but here are a few great beginner-friendly options: Brother SE600 – A combo machine that sews and embroiders. It’s affordable, versatile, and my top pick for beginners. Brother PE550D – Embroidery-only and comes with built-in Disney designs. Super cute! Brother SE1900 – A step up, with more advanced features and a larger embroidery area. 💡 Tip: Set a clear budget before buying, b uy the largest hoop your budget allows . While the SE600’s 4x4 hoop is great for starters, you may outgrow it quickly—and the next hoop size up is a big price jump. Recommended read: How to Choose the Right Embroidery Machine   ...

8 Reasons Why Your Upper Thread Is Shredding On Your Embroidery Machine

 This article is brought to you by  Lizzsews . Here are some reasons why your top thread might be shredding while you’re embroidering! Starting machine embroidery is definitely a challenge, and troubleshooting is hard.  Recommended read: 10 Things you need to start machine embroidery today Often when your top thread is shredding, it’s caused by when the thread goes through the eye of the needle or while it’s going through the thread guides.  1. A dull or bent needle How long has it been since you’ve changed that needle? It might be time to swap it out! A needle only lasts about 8-10 hours of stitching, this amount of time may vary depending on what you are making. It’s good to have lots of needles on hand. Recommended read: When should I change the needle for machine embroidery 2. Are you using the right needle for the project? Are you embroidering heavier fabrics? Like denim or leather? If so, you’ll want to use a heavier needle size like 90/14. If you’re just...

Guide To The Three Main Machine Embroidery Stabilizers

This article is brought to you by  Lizzsews . Here's everything you need to know about the three main types of machine embroidery stabilizers, what they're used for and how to pick the right one. 💡 Why Stabilizers Matter Stabilizers are essential in machine embroidery. They help support your fabric, prevent puckering , and ensure your design comes out clean and crisp. A stabilizer is placed underneath your fabric. Some special ones, called toppers , go on top, but these are only used for certain materials, like towels or blankets. 👉 You always need a bottom stabilizer. Toppers are optional and only used for specific projects. 🏷️ The 3 Main Types of Stabilizers 1. ✂️ Cutaway Stabilizer Cutaway stabilizer is non-woven , permanent, and ideal for stretchy or knit fabrics like t-shirts, baby onesies, and fleece. Why it's great: Provides strong support Prevents pulled or sagging stitches Stays put even after washing and wearing Comes pre-cut or in ro...